guides
Intended Documentation
Quickstart
Submit your first intent to the Intended authority runtime, read the APPROVED / ESCALATED / DENIED outcome, and capture the Authority Token — end to end in a few minutes.
Quickstart#
In this guide you submit a single POST /intent call, interpret the authority decision, and capture the Authority Token that downstream systems verify before they act. This is the core loop of the platform: an action is proposed, evaluated against policy, and either authorized with a signed token or stopped.
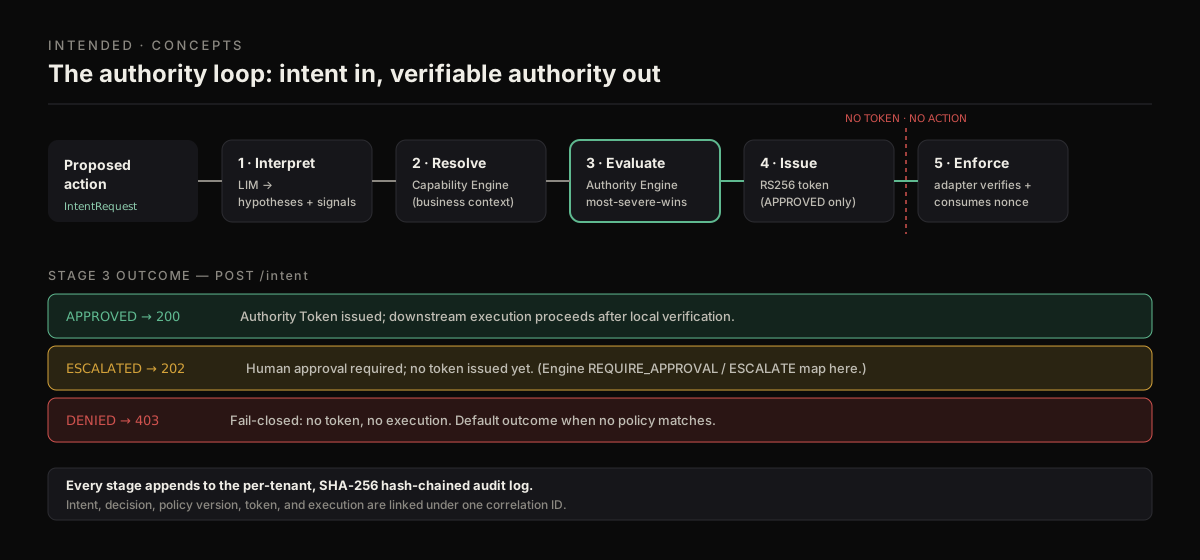
Submit a proposed action; the runtime evaluates it and returns one of three outcomes. Only APPROVED mints a token.
Prerequisites#
- A tenant ID (for example
tenant_acme_prod). - An API key for that tenant — prefixed
intended_live_…(legacymrt_…keys are still accepted). There is no separate sandbox or test key. See API Authentication. curl, Node.js, or Python — whichever you build in.
Tip
Keep the key server-side. It is stored only as a SHA-256 hash, so the raw value can never be recovered from Intended. Inject it from your secrets manager and rotate it immediately if it leaks.
Steps#
Set your credentials
Export the key and tenant so the examples stay copy-pasteable.
Submit an intent
Send the proposed action and its risk context to POST /intent. The body is an IntentRequest: tenantId, actor, targetSystem, proposedAction, and riskContext. The credential goes in Authorization; the tenant in x-tenant-id (and the body tenantId must match it, or the call is rejected with 403 TENANT_MISMATCH).
You can also do this from the command line:
Interpret the outcome
POST /intent returns one of three decisions, mapped to an HTTP status. These values — APPROVED / ESCALATED / DENIED — are the ones the intent endpoint uses.
| HTTP | Decision | What it means | Token? |
|---|---|---|---|
| 200 | APPROVED | The action verified and was authorized | Yes — in authorityDecisionToken |
| 202 | ESCALATED | A human approval is required before authorization | No (yet) — an escalationId is returned |
| 403 | DENIED | The action is not authorized; execution is skipped | No |
If the runtime cannot reach a decision, it fails closed and returns 500 AUTHORITY_LOOP_FAILED — treat that as "not authorized," never as "allow." A malformed body returns 400 VALIDATION_ERROR.
Capture the Authority Token
On APPROVED, the response carries the signed token plus the decision context and audit linkage:
The authorityDecisionToken is an Ed25519 JWT with a 300-second TTL and a single-use nonce. Hand it to whatever system performs the action; that system verifies it locally before executing. Continue with Verify a Token.
How the risk score drives the decision#
The riskContext you send shapes the outcome. The runtime computes:
The decision is rule-based and default-deny: if no policy rule matches the action, it is denied. Where multiple rules apply, the most severe wins (DENY > REQUIRE_APPROVAL/escalate > ALLOW). Interpretation-layer signals can only raise severity, never lower it. So flipping touchesProduction to true on the call above can push the same action from APPROVED into ESCALATED or DENIED.
Two decision vocabularies
POST /intent returns APPROVED / ESCALATED / DENIED. The lower-level POST /authority/evaluate engine returns ALLOW / DENY / REQUIRE_APPROVAL / ESCALATE. They map onto the same outcomes — just keep the vocabularies distinct when reading responses.
Next steps#
- Verify a Token — validate the token before any downstream system acts
- Intents API — the full
IntentRequest/ response contract - Authority Runtime Pipeline — how a decision is reached
- API Authentication — credentials, headers, scopes, and errors